
Introduction
Working in customer care you get to see every kind of issue computer users can have. This can lead to extremely interesting situations. One particularly noteworthy issue we are seeing is an interesting DNS hijack that sets the victim's computer to use specific DNS servers. While this attack might not sound that interesting and may even seem simple to fix, what if it were not easily visible to the user? What if there were a way to set static DNS entries so that the Primary and Secondary DNS servers did not show up in the expected area in the GUI? Worse yet, your settings would say you were using DHCP, as you would expect to see, when you were not. This is exactly what has been done by a recent Potentially Unwanted Application (PUA) named DNS Unlocker and by a few other threats as well.
DNS Unlocker will change a victim’s network settings to use rogue DNS servers. When the victims’ browsers look for google-analytics.com the rogue DNS server will point to a malicious server injecting additional JavaScript. This is done so that advertisements by DNS Unlocker are inserted into web pages using Google Analytics. Typically a computer user affected by DNS Unlocker will see advertisements with a note at the bottom saying, “Ads by DNSUnlocker” (see Figure 1) or something similar, and multiple different variations of “support scam” pop-ups (see Figure 2).
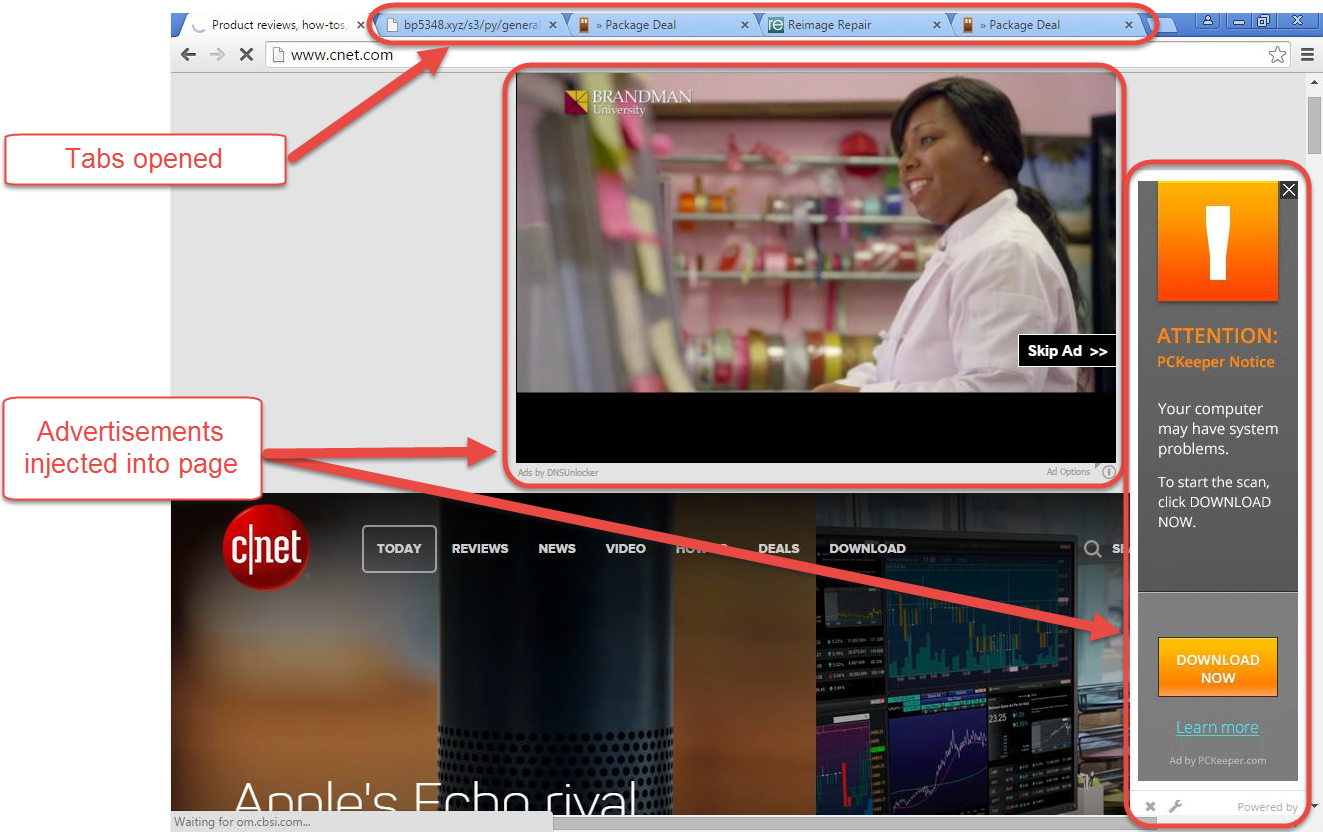
Figure 1: Advertisements injected into web page
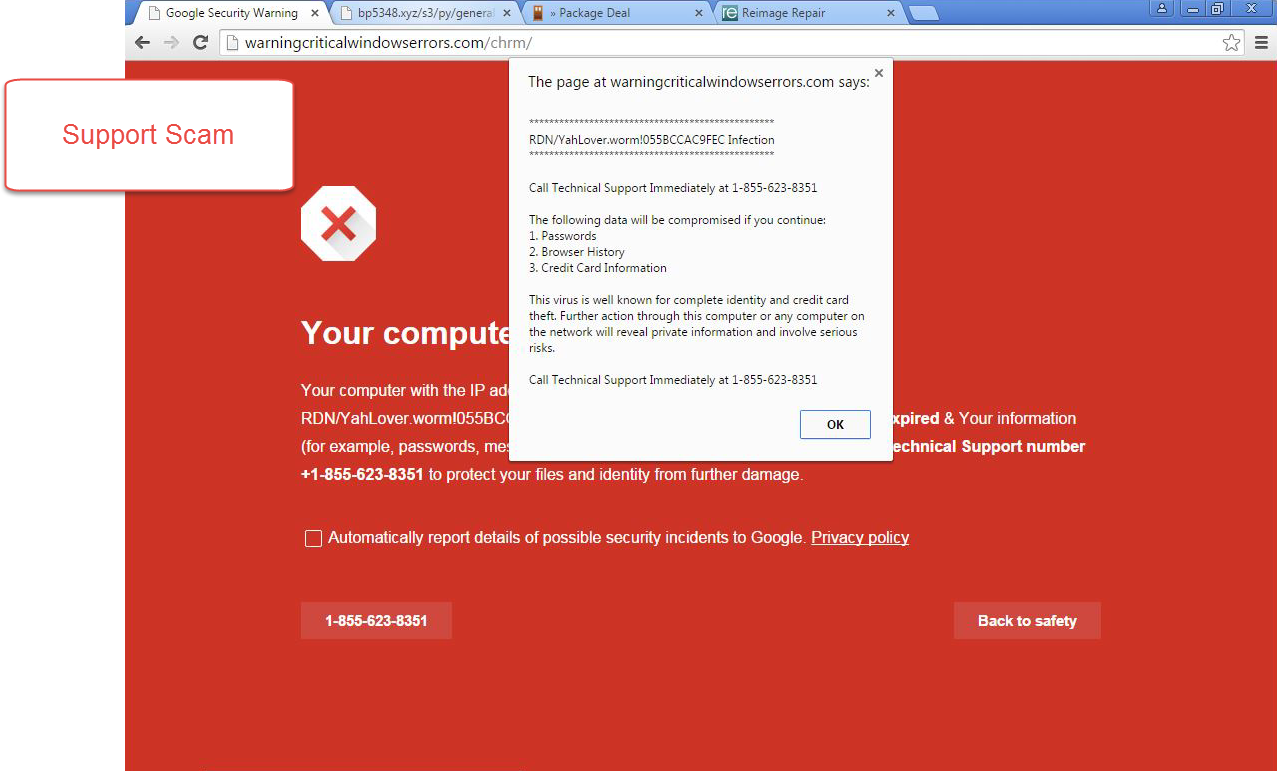
Figure 2: Support scam attempting to scare a user
DNS Settings Modifications
DNS hijackers are nothing new, nor usually even worthy of comment. What makes these recent versions of DNS Unlocker interesting is the trick they use to surreptitiously configure the victim’s computer’s DNS settings. When examining the properties of TCP/IPv4 on Windows, you would expect any static DNS entries to be displayed in the lower half of the Control Panel window, visible in Figure 3. If the option Use the following DNS server addresses is selected, there should always be an IP address in the Preferred DNS server field, and optionally there might be another in the Alternate DNS server field. However, if you are using DHCP to obtain your DNS addresses (as most Home/Home Office environments do), then the option Obtain DNS Server address automatically will be selected, as shown in Figure 3.
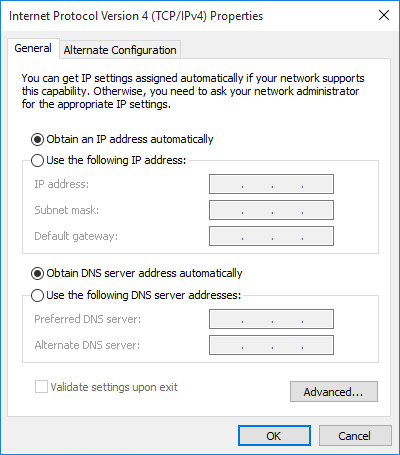
Figure 3: Windows TCP/IPv4 Control Panel with typical settings
Here is the kicker: The DNS Unlocker PUA will set its victims’ static DNS configurations in such a way that the TCP/IPv4 Control Panel will display that you are obtaining your DNS automatically. In fact, the command ipconfig /all from the command line will also indicate you are using DHCP, but you will see the statically set DNS addresses. When using ipconfig , although you can see the static DNS addresses, there is no way to tell whether you are using a static DNS address or if it is being obtained automatically; in the GUI, however, it appears that you are using an automatically assigned DNS server address when in fact you are using the (non-displaying) static one(s). How is the GUI not able to see that you are using static DNS? To understand that, we need to see how Windows looks at static DNS in the registry.
DNS in the Windows Registry …
Examine the following location in the registry:
HKEY_LOCAL_MACHINE\SYSTEM\CurrentControlSet\Services\Tcpip\Parameters\Interfaces\
You will likely see there are settings for multiple network interfaces, each identified with a GUID. The settings for each different network adapter can contain values DhcpNameServer and NameServer. The NameServer value is what we will be examining. Typically, if you want to use static DNS, you will set it in the Control Panel (or via the netsh command) and your static DNS addresses will be stored in the NameServer registry value as a comma-delimited list, like so:
192.168.1.21,192.168.1.22
What happens if, instead, you use a space-delimited list?
192.168.1.21 192.168.1.22
That is one small change and Windows will still be able to use both addresses – one as Primary and the other as your Secondary DNS. But the Windows GUI is not able to display that the computer is using static DNS in the lower half of the Control Panel, as shown in Figure 3. What is displayed is that the computer is using DHCP for your DNS, when in fact the computer is not. And the frustrating part about all this is that if you are working with a customer who is getting advertisements injected into sites or is having redirects occur while web browsing, when you decide to test if setting known good DNS servers corrects the issue by manually setting them in this Control Panel, it won’t help.
Since Windows considers that the Primary and Secondary DNS servers are already set (but not shown to you), when you fill in the Preferred and Alternate fields, Windows just appends these new settings to the end of the list in the registry like this:
192.168.1.21 192.168.1.22,208.67.222.123,208.67.220.123
As you can see, Windows uses comma delimitation for the third and fourth DNS server entries, but leaves the existing space delimiter between the first and second addresses.
Now that we know how this works, the real question is why is this even allowed to work? For that, I do not have a good answer. My hypothesis is based on how the DhcpNameServer value is intended to use a space separated list and how Microsoft explains its behavior on TechNet:
If the value of NameServer is valid, it takes precedence over the value of DhcpNameServer
(Source: DhcpNameServer article on Microsoft TechNet)
Since DhcpNameServer is allowed to have space delimitation, then NameServer is allowed to as well. Also, there is evidence that the NameServer value was intended to use “space” delimited lists when looking here on TechNet; in fact, this documentation suggests that only space delimitation is allowed. However, that is just a conjecture. In reality, this is a non-standard property that Windows has and the Control Panel just doesn’t know how to handle properly in its GUI. The Control Panel will not let you enter a space-delimited list or a comma-delimited list. It creates the comma-delimited list from whatever the user enters into the Preferred and Alternate DNS server fields of its GUI, but the rest of the code elsewhere — that reads this registry value accepts the space-delimited form — and “works properly” with either delimiter. The Control Panel GUI, however, does not work the same way, as it does not display the space-delimited entries other than on the Advanced tab.
And DNS in your Network Settings …
Worse, however, is that this feature is being used by PUAs in order to continue to force the use of their DNS servers in preference to the intended servers on computers that have been afflicted. In short, this is a DNS hijack, which forces the use of “hidden” DNS servers. I call them hidden, because the statically set DNS servers do not show in the expected Primary and Secondary fields of the TCP/IPv4 Properties.
Now that we know how DNS is being set improperly in the registry, let’s look at one more area of the TCP/IPv4 Properties. The area of interest is the Advanced TCP/IP Settings window in the DNS tab in Figure 4. The top portion of this tab has a list that dictates the order of use for DNS servers and allows you to specify the use of more than two IP addresses as DNS servers. Each address should be on its own line. Now, if your DNS has been hijacked and hidden, then your TCP/IP settings will look something like Figure 4.
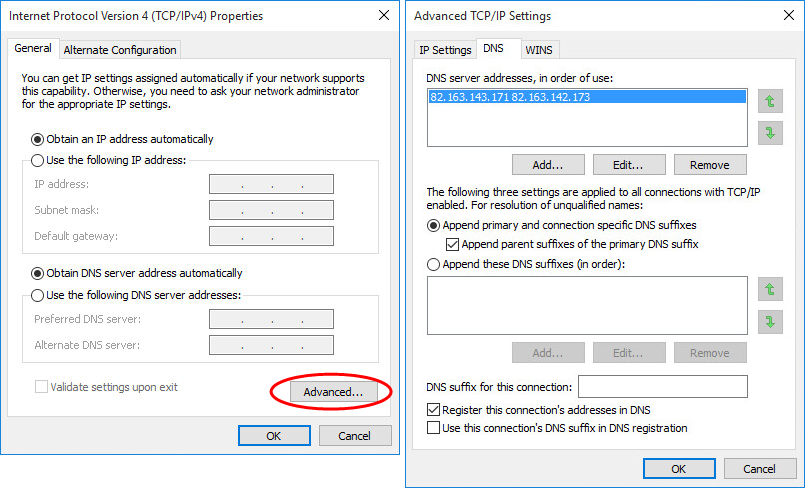
Figure 4: Windows Advanced TCP/IPDNS Settings Control Panel with “hidden” DNS settings
As you can see, there are two addresses in one line separated by a space. If you were to attempt to use the Add … button to add two addresses separated by a space, you would get an error stating Invalid IP Address and you would not be able to add it. If you were to manually specify DNS servers into the Preferred DNS server and “Alternate DNS server” on the TCP/IPv4 properties page while you have hidden DNS, you would find that what you specified appears below the hidden DNS entries, something like the example in Figure 5.
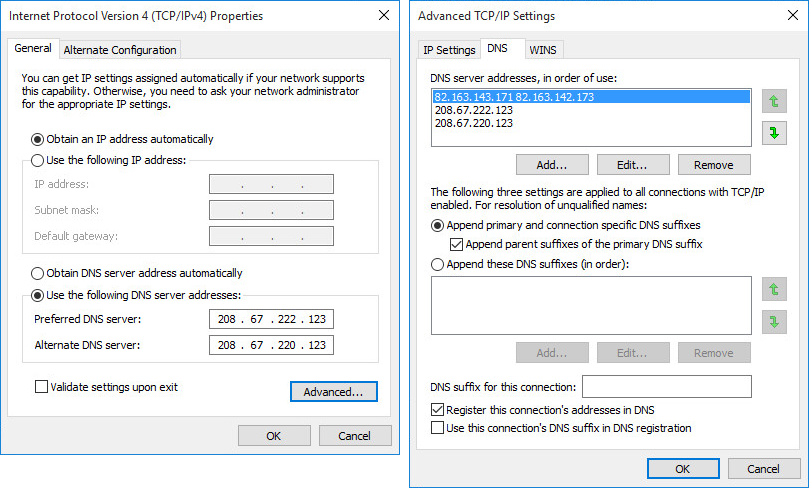
Figure 5: Manually setting known good DNS entries when “hidden” DNS settings were already in effect
Remediation
Luckily, you can remove the bad DNS entries from the DNS tab of the Advanced TCP/IP Settings page. You just have to remember to look there.
Responsible Disclosure
ESET reported the issue to the Microsoft Security Response Center (MSRC) on May 10th, 2016. An MSRC representative acknowledged the problem, but said it was not classified as a security vulnerability. Their provided reasoning for not considering this a security vulnerability is, ‘As modifying the registry requires administrative privileges we do not consider this to meet the bar for security servicing through MSRC’. They have forwarded this issue to appropriate teams to consider for future versions.
Summary
To sum up, since Windows will read and use a space-delimited list of DNS server addresses in the NameServer value for an interface, instead of strictly enforcing comma separated lists, PUAs can use this method to hide their DNS settings on your system. This method of hiding rogue DNS settings has been seen in the wild since December 2015, in DNS Unlocker on Windows XP, Vista, 7, 8/8.1 and 10 (x86 and x64). Finally, of special interest: applying the same technique to hide statically-set DNS addresses using a semicolon-delimited list works as well, though we have not seen this used by malware or PUAs as of May 31th 2016 when this was written.
Indicators of Compromise (IoC)
The version of DNS Unlocker described herein is detected by ESET as MSIL/Adware.CloudGuard.C application. It uses the following IP Addresses to hijack DNS:
- 199.203.131.145
- 199.203.131.150 to 199.203.131.152
- 82.163.142.2 to 82.163.142.7
- 82.163.142.66 to 82.163.142.70
- 82.163.142.130 to 82.163.142.189
- 82.163.143.131 to 82.163.143.190
- 95.211.158.129 to 95.211.158.135
- 95.211.158.145 to 95.211.158.151
The following IP addresses are used as HTTP servers to inject the malicious JavaScript that shows the ads in web pages:
- 82.163.143.23 to 82.163.143.250
- 209.88.193.133 to 209.88.193.141
Malware samples using this technique:
| SHA-1 | ESET Detection Name | NameServer values used |
|---|---|---|
| E7108973D9AE0BDB97801C959622E1ECECDCE80E | MSIL/Adware.CloudGuard.C application | 82.163.143.17 182.163.142.173 |
| AEEEA6C3697D983337598E2D3B940DB0225A05CB | Win32/Agent.XSF trojan | 199.203.131.145 82.163.143.167 |
| A9AC712B4D31F20AC3DEFC066D66C2982A4ADC0C | Win32/DNSChanger.NDI trojan | 199.203.131.151 82.163.143.181 |
| 1A1764F7AA3E9F81B23997982E1BDB300D3707B1 | Win32/Adware.Adposhel.F application | 82.163.142.3 95.211.158.130 |
James Rodewald
Malware Removal Support Supervisor
ESET
The views and opinions expressed in this article are those of the author and do not necessarily reflect the official policy or position of WLS nor ESET.