 Malware activity exploiting Autorun on Windows computers has been generating quite a few calls to ESET support lines lately, reminding us that old infection techniques seldom die and USB flash drives can still be an effective means of getting malicious code onto a computer. USB drives can be used to infect computers that automatically execute files on removable media when that media is inserted. On Windows machines this is known as the Autorun feature (referred to as Autoplay in Windows 7), and it was originally designed to simplify access to CD content.
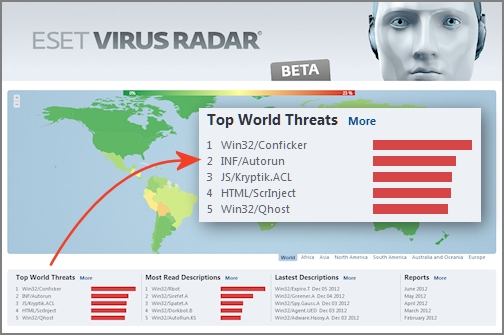
At ESET we flag malicious autorun.inf files as INF/Autorun and this category of threat currently holds the number two spot in our Top World Threats, as displayed on our Threat Radar page. One particular USB-enabled worm--detected by ESET as Win32/Pronny.xx--has been quite active of late and it employs autorun.inf files detected as INF/Autorun.AC. According to our support experts this malware is showing up on company networks, notably on machines where antivirus is not up-to-date or properly configured. In this post I have shared the instructions that our support folks have put together for the removal of Win32/Pronny from one computer or from a network.
 As mentioned, the Win32/Pronny.xx worm can spread via removable media, such as USB flash drives. When it infects a system it tries to download and execute several files from the Internet (none of them good).
Apart from being malicious, INF/Autorun.AC can also be very confusing to users of infected machines. That's because the malware will not only attempt to utilize Autorun features to execute malicious code, but it may also hide all files and folders in a network share, while at the same time replacing them with executables with the same name and icon as the files/folders which were hidden.
You can see how this might create confusion, not to mention more malicious activity. For example, if you have a Folder named “Accounting” it will be hidden and an infected/infecting executable with the same name will be made. This helps the infection load even if the Autorun feature does not: an unsuspecting user may well double-click this executable thinking it is their folder. This malware may also bait users by making executables with the following tempting names:
- Porn.exe
- Sexy.exe
- Secret.exe
- Passwords.exe
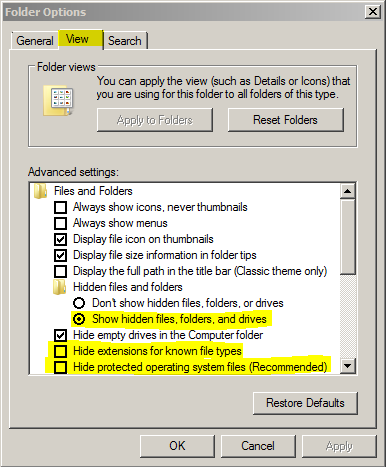
Adding to the confusion: If you are infected with Win32/Pronny and your antivirus is removing it, at first glance you may think that all your Files and Folders from your network shares are missing due to the changes the worm made to the file attributes. To verify that these files are still there you will need to enable viewing of not only “Hidden Files and Folders” but also “Protected Operating System Files” as well.
(Note that if you are using ESET it will call the autorun.inf files for this worm “INF/Autorun.AC” and the executables made by the malware will be called “Win32/Pronny.xx”. If you are not using ESET, the infections may be called something else.)
If you encounter this infection, the steps below will help in isolating the infection and cleaning your network (for a more detailed set of instructions check out this ESET Knowledgebase article).
- Disable autorun and removable media on all computers for your network. The following Microsoft KB Article has detailed information for this: http://support.microsoft.com/kb/967715
- Ensure that you are viewing hidden files, system files, and file extensions. This will allow you to see any files which may have been hidden by the infection as well as being able to see any executables which were made by the infection. These settings can be set in the “View” tab of “Folder Options”.
 For any files which were not detected by your antivirus solution, you will want to submit samples to your antivirus vendor. These files will be in the root folder of any shared folder or removable media.
- To see the user account which created the files, you can check the Ownership of the files. You probably want to disable accounts that have ownership of the infected files, and remove from the network those computers from which the identified user accounts are logging into the network. Usually this will only be one or two accounts, but these accounts will likely be where the infection started from.
- Since this infection spreads using file shares it is recommended to temporarily disable file sharing during the disinfection process.
- Remember, for any .exe or .inf files that are not detected by your AV, samples should be submitted. You will need to check the root folders for the shares for any autorun.inf files or suspect EXE files. If you see multiple EXE files with the same file size in one folder, they are likely suspect.
- Quarantine any samples using your antivirus solution, then delete the files.
- Before starting scans on all computers in the network ensure your antivirus solution is up to date with its virus signatures. This is extremely important if your antivirus is not detecting the infected files: the infection could be overlooked due to outdated virus signatures. If you have up-to-date virus signatures and the infection is not being detected, you will need to submit samples using step 6 of these instructions and wait for new signatures to be added by your antivirus vendor before scanning.
- For computers which were removed from the network in step 4, you will want to scan these machines in an isolated environment (again, with up-to-date virus signatures). You will want to do the same for any removable hard drives.
- Once the network is clean, re-enable disabled accounts and force a password change on these accounts. Changing any and all User and Admin passwords is recommended as well.
- Lastly you will need to remove the Hidden and System attributes from files to which the infection added these attributes. Use of the “attrib” command will work for this. You will want to do this from an Administrative Command prompt (note that it may take a while for this process to complete--the more files you have, the longer it will take).
- The syntax to use is: attrib -s -h "%PathToUnhide%*" /s /d
- Example command: attrib –s –h K:* /s /d
Hopefully you won't have to deal with Win32/Pronny, but if you do, I hope you find these instructions helpful Of course, regardless of whether or not you have been infected by Win32/Pronny, there is one process you will want to explore: making sure Autorun is disabled on your Windows PCs. We have blogged about this on numerous occasions, including this 2010 post about Autorun/Autoplay in Windows 7, with links to helpful Windows XP and Vista patches.
With many thanks to the folks in Customer Care who provided much of the information about Win32/Pronny and its removal.


